> For the complete documentation index, see [llms.txt](https://h0t.gitbook.io/h0t/llms.txt). Markdown versions of documentation pages are available by appending `.md` to page URLs; this page is available as [Markdown](https://h0t.gitbook.io/h0t/boxes/tryhackme/tryhackme-blog-writeup.md).
# TryHackMe Blog WriteUp
### Tryhackme Blog Writeup
Hello Again :)
### **Reconnaissance and Enumeration**
as usual, we start with scanning the machine
**nmap scan**
we have 4 ports open, ssh, http, and samba, its a good practice to check ftp, samba or nfs before going to the web server.
**samba enumeration**
i will use `smbclient -L [IP HERE]` to check for avilable shares.
found BillySMB, we connect to the share.
found three files, we can extract them by using `get FILE_NAME`. lets check them!
check-this.png
[](https://421213191-files.gitbook.io/~/files/v0/b/gitbook-x-prod.appspot.com/o/spaces%2FfUOAAeVs9eihqxcrtvIC%2Fuploads%2F2oSMBtiJDv56Z65PV7Hk%2F1%204.png?alt=media)
if you scan it you will go to this link :)
Alice-White-Rabbit.jpg
nothing important
tswift.mp4
also nothing important
**web enumeration**
now lets check the webpage
the page is struggling to load which is weird, as in the description “you’ll need to add blog.thm to your /etc/hosts file”
the flag -a in tee means you append what you pipe into it, without it the file will be wiped.
we find a blog (obviously), its powered by wordpress.
since its powered with wordpress and we can access the admin panel, i will use wpscan to scan for usernames.
the command:
```bash
wpscan --url http://blog.thm/ --enumerate u
```
the wordpress version is 5.0, we could use this later or search for a CVE. we found two users: kwheel and bjoel, now its time to get the passwords, i will create a file named “users.txt” with the usernames in it.
the command:
```bash
wpscan -U users.txt -P /usr/share/wordlists/rockyou.txt --url http://blog.thm
```
success!!! we found the password for kwheel
we try the credentials to access the admin panel and bingo we’re in!
***
### **Initial Access:**
**CVE-2019-8943**
now lets search for a cve. we know from the wp scan the wp version is 5.0.
we find in exploit db CVE-2019-8943 named Crop-image Shell Upload, which is already has a script for it in metasploit framework!
to access metasploit just type in the terminal:
```bash
msfconsole
```
we edit the options, type exploit, and we are in!!!
to find the user flag i will use the command :
```bash
find / 2>/dev/null | grep user.txt
```
well it’s not the right file.
***
### **Privilege Escalation:**
instead of looking for the user flag lets look for a way to escalate our privileges. i used this command to search for binary SUID’s.
```
find / -perm -u=s -type f 2>/dev/null
```
alot of these are common, but /usr/sbin/checker is not, lets check it out.
the binary checkes whether the user is admin or not.
to check how this tools works, i will use `ltrace` which captures any library calls and prints it out for us! it seems checkes if the user is admin or not by reading an environment variable named “admin”.
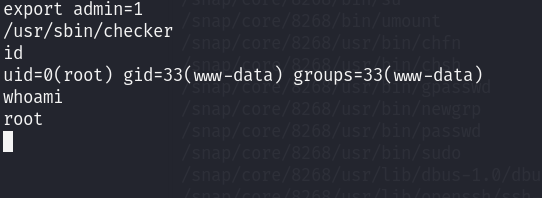
so we can exploit this if we set an environment variable , export admin=1
**root.txt**
success we are root!
**finding user.txt**
we go back to find the user flag, so we search for it again since we own the machine now.
now the machine is pwned.
happy pwning :)